
|
|
|
In this manual, all functionality of ToneGen will be explained in detail. I recommend looking through this document, as I provide many tips on the various aspects of the synthesizer.
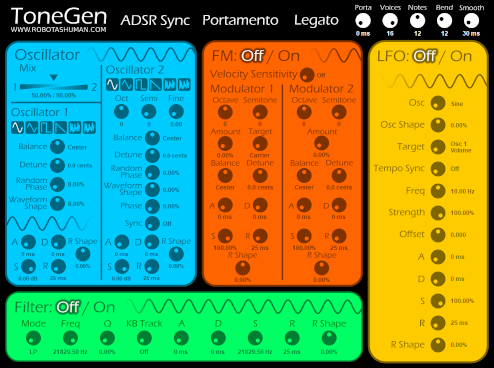
The controls of the ToneGen GUI are distributed among five different areas: the top section, the Oscillator section, the FM section, the Filter Section, and the LFO section. Each area is color-coded and it should be easy to gain familiarity with the layout.
By default, the FM, Filter, and LFO options are not active. To turn one of them on, just click the "On" in the upper portion of the respective section: "On" will be highlighted in white. To deactivate, click "Off."
ToneGen includes sixty built-in presets that demonstrate its various capabilities. User modifications to any preset are saved, even as other presets are loaded. To return to the original preset settings, simply reset the plugin (i.e., destroy and relaunch ToneGen in your DAW).
|

|
|
The controls in the upper section modify parameters that affect all of the other four sections.
The words ADSR Sync, Portamento, and Legato are actually controls. Click on one of them once: that control will activate and the letters will glow in blue. Click on it again to deactivate it; the blue glow will disappear.
|
| ADSR Sync |
ToneGen features six separate ADSR envelopes, as described below in more detail. Activating this control will sync all of them together: for example, turning the R knob in the Oscillator 1 section will cause the other five R knobs to also turn to equal the same value.
|
| Portamento |
When this is activated, the pitch of a struck note will slide up or down depending on the notes that were struck previously. For example, strike middle C then strike the A below: when the A is struck, the pitch begins at middle C then slides downward until it reaches A. The speed at which the pitch slides is determined by a knob that will be explained below.
|
| Legato |
Legato also affects pitch, but in this case when notes are played simultaneously. Strike and hold middle C, then strike the A below: the pitch of the note immediately jumps from C to A. Let go of A and the pitch returns to C. Note that all simultaneous note pitches and velocities are remembered. Strike and hold middle C with low velocity, then strike and hold D and E at higher velocity: when you let go of the D and E, the note pitch returns to middle C at the original low velocity.
|
|
|
Portamento and Legato can be used simultaneously!
When both portamento and legato are activated, things are a bit different. When the first note is struck and held, the pitch remains constant, but when an additional note is struck, the pitch slides to match the new note. When the second note is released while the first remains held, the pitch slides to the original note.
|
|
|
The remaining controls in the top section are five knobs: Porta, Voices, Notes, Bend, and Smooth.
|
| Porta |
As you may have suspected, this knob affects the portamento function, specifically the speed at which the pitch slides. The rate of speed ranges from 0 milliseconds, for instantaneous results, to 5,000 milliseconds, if you're in the mood for slow glides.
|
| Voices |
This knob affects ToneGen's polyphony, or the number of notes that can sound simultaneously. The default value, and also the maximum value, is 16. The value can be any integer from 1 to 16, so if you're in a monophonic mood, just turn this knob to 1 and you're set. Note that struck notes sound on a "first in, first out" system: if the polyphony is at 3 and a note is struck while three others are alreading sounding, the new note will replace the first note that was struck.
|
| Notes |
This control is a little experiment: it determines how many distinct notes there are per octave. The default value is 12, which is the number of notes used per octave in the majority of Western music. The value of this knob can range from 1 to 24. Note that regardless of the value set, the traditional middle C (MIDI note 60) will always be at a frequency of 261.626 Hz.
|
| Bend |
This controls the amount of effect that pitch wheels on MIDI keyboards and similar devices have on the frequencies of struck notes. The range of values depends on how many notes there are per octave; at twelve notes per octave, the range is 1 to 48. This value indicates semitones, so when it's 12, the pitch will be one octave lower when the wheel is at its lowest position and one octave higher at its highest position.
|
| Smooth |
This knob deals with the smoothing of parameter changes. It mainly prevents the dreaded clicks that occur when the value of a knob suddenly changes. The value is defaulted to 30 milliseconds, but can range from 0 milliseconds (if you actually enjoy clicks) to 1,000 milliseconds. But wait, there's more! This knob also affects four additional important things: the speed at which note pitch slides when the relative pitch knobs of the Oscillator and FM sections are turned, responsiveness when controlling volume and balance via a MIDI device, the speed of velocity changes when the polyphony limit is reached, as well as the speed of velocity changes in legato mode.
|

|
|
ToneGen features six separate ADSR envelopes: one for each oscillator, one for each FM modulator, one for the filter, and a final one for the LFO. Envelopes such as these are synthesizer staples and are used in ToneGen on a per-note basis for controlling the volume level of each oscillator, as well as the amount of FM modulation, filter frequency, and LFO strength. Note that each note has separate envelopes for each of these functions, so you shouldn't worry about any envelope conflicts.
|
|
|
The envelope controls include A, D, S, R, and R Shape.
|
| A |
"A" stands for "attack" and is the first step of each envelope: it determines the amount of time it takes, in the case of the oscillators, for the note to go from no volume to the maximum volume. The range of values that can be set are 0 milliseconds to 5,000 milliseconds. Note that if the time is 0 milliseconds, the attack stage is skipped and the note begins at the decay stage.
|
| D |
"D" stands for "decay," which follows the attack stage. This controls the amount of time it takes to go from the maximum level to the sustain level. As with the attack stage, the range of values are 0 milliseconds to 5,000 milliseconds; if 0 milliseconds is set, the decay stage is skipped.
|
| S |
"S" means "sustain" and is the level that each note settles at after the decay stage. If the attack and decay are both at 0 milliseconds, this is the stage that a note begins at. For each oscillator, the range of values for the sustain stage are "-inf dB" (silence) to "0.00 dB" (max volume). For the FM modulators, the values go from "0%" (no modulation) to "100%" (max modulation). Likewise, the filter sustain control determines frequency and the LFO sustain control determines strength.
|
| R |
"R" stands for "release," the final stage of the envelope. It determines the amount of time it takes for the note to go from the sustain level to the absolute minimum level. The values range from 0 milliseconds to 5,000 milliseconds. Note that the default R value for each envelope is 25 milliseconds; if you like clicks, set it to 0 milliseconds.
|
| R Shape |
ToneGen also features an additional "R Shape" control for each envelope, which functions much like the "Waveform Shape" control for each oscillator that is described below. The default value for this knob is "0.00%," and the range is "-100.00%" to "100.00%." At 0%, the slope of the release is absolutely linear, like drawing a straight line between the sustain level and the minimum level. At values below 0%, the release slope begins more gradually then get steeper, while at values above 0%, the release slope begins steeply then becomes more gradual. Note what happens when this value is -100%: the level doesn't change at all until the release time is reached, at which point the note ends. This is useful for the filter, for example, in case you want to have the filter frequency remain constant and unchanged by the note release.
|

|
|
ToneGen features two separate non-bandlimited oscillators (aliasing is your friend), and each has a number of parameters available for tweaking.
|
|
|
There is one knob that affect both oscillators: Mix.
|
| Mix |
In ToneGen, both oscillators are always active and neither can be switched off. However, this knob allows you to crossfade between the two. The default value is "50.00% / 50.00%," which means both oscillators are outputting at the same level. Both percentages can range from 0.00% to 100.00%, but they are inversely proportional: turn the knob all the way to the left, "100.00% / 0.00%," and you will only hear oscillator 1. Likewise, turn it to the right, "0.00% / 100.00%," and only oscillator 2 is heard.
|
|
|
Next, the controls that are common to both oscillators will be detailed: the Osc Switch, Balance, Detune, Random Phase, and Waveform Shape.
|
| Osc Switch |
Here, you will see six little images of waveforms. Click on one and that's the one you'll get; it will be highlighted in white. The default is sine, but you can also choose triangle, pulse, saw, white noise, or brown noise. Note that the images for white noise and brown noise look alike, but white noise will be highlighted in white and brown noise will be highlighted in brown. Also note that when either of the two noise options is selected for an oscillator, the following controls will have no effect: Pitch, Detune, Random Phase, Phase, and Sync.
|
| Balance |
This affects the stereo balance of an oscillator. The default value is "Center," meaning that the left and right channels are at the same level and are unmodified. Note that this control affects stereo balance, not panning: turn the knob all the way to the left, "100% left," and the left channel will contain both the left and right channels, each at full volume, and the right channel will be silent. Similarly, "100% right" makes the right channel contain both the left and right channels with the left channel being silent.
|
| Detune |
This is for stereo detuning of an oscillator. The default value is "0.0 cents;" the pitch of the left and right channels are unmodified. The value ranges from "-100.0 cents" to "100.0 cents," with 100 cents being the distance of one semitone. Note that the right channel is inversely affected by this value: at "100.0 cents," the pitch of the left channel will be 100 cents higher than the struck note and the pitch of the right channel will be 100 cents lower.
|
| Random Phase |
This control affects the initial phase of an oscillator when a note is struck; as this value increases, the initial phase drifts farther away from the starting point. The default value, "0.00%," means that, when a note sounds, the phase of the oscillator in both the left and right channels will always be at the exact beginning of the waveform. The value ranges from "0.00%" to "100.00%." Note that this control has an element of randomness: when the value is "10.00%," the initial phase of the oscillator will fall somewhere between 5% before the start of the waveform to 5% after. Also note that the values for left and right channels are randomly chosen separately.
|
| Waveform Shape |
This modifies the shape of a waveform; the default value of "0.00%" leaves the waveform untouched. The control ranges from "-100.00%" to "100.00%." When the value is less than 0.00%, the waveform stretches outward toward the maximum level, and at over 0.00%, the waveform shrinks toward the minimum level. To illustrate, when this value is at -100.00%, a sine wave turns into a square wave. Note that when a pulse wave is selected for an oscillator, this control magically changes to Duty Cycle. The duty cycle of a pulse wave is the ratio of the higher value of the waveform to its lower value; at "25.00%," the beginning quarter of the waveform will be at its higher value while the remaining three-quarters will be at its lower value.
|
|
|
To wrap up the Oscillator section, the controls unique to the second oscillator will be discussed: Oct, Semi, Fine, Phase, and Sync.
|
| Oct |
In ToneGen, the pitch of second oscillator can be modified in a way that is relative to the note being struck. This control determines the oscillator's relative octave, and the value ranges from -5 to 5. Strike middle C when this knob is at 2: the pitch of the second oscillator will be two octaves above.
|
| Semi |
This is used to set the relative semitone of the second oscillator. The range of values is determined by how many notes there are per octave; at twelve notes per octave, it's 0 to 11. Strike middle C when this value is 4: the pitch of the second oscillator will be at the E above.
|
| Fine |
The last relative pitch knob of the second oscillator, this control determines how many cents the pitch will be raised. The value ranges from "0.00" to "100.00;" at 100.00, the second oscillator's pitch will be one semitone above the struck note.
|
| Phase |
This controls where the phase of the second oscillator is, and can be adjusted at any time. The value ranges from "0.00%" to "100.00%," the percentage indicating at what point the phase is at over one complete waveform cycle. For example, when both oscillators are outputting the same exact waveform and this value is at "50.00%," the phase of the second oscillator will be inverted and the two oscillators will cancel each other out, causing no sound to be heard.
|
| Sync |
This is an interesting control: when activated, the phase of the second oscillator will be synced to the first, meaning that when the first oscillator goes through one complete waveform cycle, the second oscillator's phase will change according to the type of sync, regardless of its frequency. There are three types of sync: "hard," "soft," and "reverse." With hard, when the phase cycle of the first oscillator restarts, the phase of second oscillator also resets to its beginning. With soft, the direction of the second oscillator's waveform reverses. Finally, with reverse, the phase of the second oscillator inverts. Note that when this control is set to either hard, soft, or reverse, the pitch wheel on a MIDI keyboard or similar device will have no effect on the first oscillator's frequency.
|

|
|
FM stands for "frequency modulation." This type of audio synthesis was developed in the late 1960's and was famously featured in Yahama's DX7 synthesizer. In frequency modulation, there are two concepts: carriers and modulators. A carrier is what is heard when a note is struck, and the carrier's frequency is continuously altered by one or more modulators in a variety of ways.
In ToneGen, the FM capabilites are rather modest. There are two carriers (the first and second oscillators) and each carrier has two modulators, with the first modulator being able to modulate either the carrier or the second modulator. Note that each carrier is modulated separately and then the two are mixed together. Also, the results are best when the carriers are both sine, but try other waveforms if you're feeling adventurous.
|
|
|
There is one control that affects both modulators: Velocity Sensitivity.
|
| Velocity Sensitivity |
When this control is enabled, the amount of frequency modulation is affected by the velocity of the note that is struck: a note struck at half the velocity of another note will receive half the modulation.
|
|
|
The first modulator has one control that the second modulator doesn't: Target.
|
| Target |
This control determines what the first modulator affects: the carrier or the second modulator. Note that, when the value is "Modulator 2," the first modulator's controls will have no effect on the sound if the modulation amount of the second modulator is at 0.00%.
|
|
|
There are five controls that are common to each modulator: Octave, Semitone, Amount, Balance, and Detune.
|
| Octave |
Just like the "Oct" knob of the second oscillator, this control determines the octave of a modulator relative to the note that is struck. The value ranges from -5 to 5: five octaves below to five octaves above.
|
| Semitone |
Yes, this knob determines the relative semitone of a modulator. The range of values depends on the number of notes there are per octave.
|
| Amount |
This control affects the amount of modulation that is applied to a carrier. As the value increases, the carrier gains more harmonics. The value goes from 0.00% to 100.00%, with 0.00% having no effect on the carrier.
|
| Balance |
This controls the stereo balance of a modulator before it is applied to a carrier. Note that, just like the balance knobs for the two oscillators, this affects balance, not panning.
|
| Detune |
This determines stereo detuning of a modulator, as with the knobs for the two oscillators, and like the controls for modulator balance, it is applied to the modulator before it has an effect on the carrier.
|

|
|
A filter removes frequencies that are present in a sound. The frequencies affected depends on the type of filter; for example, a low-pass filter removes frequencies above whatever frequency value is given to the filter by the user interface.
|
|
|
ToneGen's filter has four controls: Mode, Freq, Q, and KB Track.
|
| Mode |
The filter in ToneGen has three different modes, and the mode in use is determined by the value of this control. The three options are: "LP" or low-pass (removes frequencies above the frequency value), "HP" or high-pass (removes frequencies below the frequency value), and "BP" or band-pass (removes frequencies above and below an area that depends on the frequency value).
|
| Freq |
This sets the frequency value that is used by each of the filter modes, and can be set from "415.00 Hz" to "20000.00 Hz." Note that this value is just an approximation, but it's fairly accurate. Also note that when the "KB Track" control is activated, this knob has no effect and will display "N/A."
|
| Q |
Another name for "Q" is "resonance": it determines the amount of presence that the frequency set by the filter has in the sound. The value of this control ranges from "0.00%" to "100.00%," but setting it all the way to 100.00% is usually disastrous.
|
| KB Track |
This is a nice little knob: when set to "On," the filter's frequency is determined not by the "Freq" knob but by the frequency of the note struck. This allows for interesting sounds; for example, select brown noise for the oscillator and set the resonance to its maximum value. Note that, when more than one note is struck simultaneously, every note is filtered separately so there will be no conflict of frequency.
|

|
|
LFO stands for "low-frequency oscillator." A common feature within synthesizers, LFOs are used not to produce sound but rather to modulate various parameters.
|
|
|
ToneGen has quite a few controls for its LFO. The options are Osc, Osc Shape, Target, Tempo Sync, Freq, Strength, and Offset.
|
| Osc |
This determines which waveform the LFO oscillator will use. You have all of the same options as you do with the two oscillators, with the additional option of having the saw be at either an upward or downward slope.
|
| Osc Shape |
This control has the same effect on the LFO that the "Waveform Shape" controls have on the two oscillators. As with the main oscillators, setting the LFO waveform to pulse will cause this knob to change into Duty Cycle.
|
| Target |
This is an important control: it sets the parameter that is affected by the LFO. There are a number of options provided by this knob. You can modulate: oscillator 1 or 2's volume, pitch, balance, or waveform shape; modulator 1 or 2's amount or balance; or the filter's frequency.
|
| Tempo Sync |
This allows you to sync the LFO frequency to the tempo provided by your DAW. When active, the LFO frequency knob will change, as described just below.
|
| Freq |
You change the frequency of the LFO with this control. The value ranges from 0.00 Hz to 20.00 Hz, with the default being 10.00 Hz. Note then when "Tempo Sync" is active, this knob becomes Length, or the number of steps it takes for the LFO to complete one full cycle. When tempo-synced, the range of values depends on the number of beats per measure there are in your project. Note that, in ToneGen, each beat of music has four steps, so if there are four beats per measure and this control is set to 64 steps, it will take four bars of music for the LFO to complete one full cycle.
|
| Strength |
This determines how much modulation is applied to whichever parameter the LFO is affecting, and the value ranges from 0.00% to 100.00%. If, for example, the LFO is affecting oscillator 1's balance, the oscillator will remain centered if this value is at 0.00% and will move from fully left to fully right when set to 100.00%.
|
| Offset |
So what's "offset," then? Well, say the LFO is modulating oscillator 1's balance and the strength is at 50%. That means there is 50% that is unused: the balance will only go from 50% to the left to 50% to the right. With the offset, you can change the center point of the LFO; if the strength is at 50%, the offset value ranges from -0.250 to 0.250. When the LFO is affecting balance and the strength is at 50%, an offset of -0.250 will cause the oscillator to go from 100% left to the center, while an offset of 0.250 will make it go from the center to 100% right. Note that the offset will automatically adjust based on the LFO strength.
|
|
|
Wait, did you just read through this whole manual?
You are now the ToneGen Master!
|